In this RankSense Webinar, we were joined by Charly Wargnier who is a member of the Streamlit Creators Program. Streamlit is a Python open-source library used to make data apps quickly. Charly takes us on his Python journey from starting out in digital marketing with image editing software like Photoshop all the way to working for Streamlit. Having a lot of experience in SEO and Python, Charly demonstrates how to build a HTTP Code Checker in Python using the Streamlit library.
Here is a full recording of the webinar:
https://youtu.be/TZKjKEyBHKc
During this webinar, Charly aims to spread the knowledge of Python by scripting simple, basic tasks such as checking HTTP codes.
Charly Wargnier Background and SEO Journey
Charly started out with interest in digital marketing. He had knowledge of image editing software and marketing prowess. He joined Streamlit Creators Program dabbling with CSS and HTML. Charly currently focuses on using Python to facilitate improvement in data source management.
Charly started studying Python in 2017, as he began to see the limitations of Power BI. He started by learning through tutorials online, and applying those scripts in his workflow. Slowly, he started to see the benefits of Python and how it empowered people in the SEO community. In other words, those who wanted to manage data in a more elegant manner. However, platform and library dependencies make Power BI less than ideal for managing data sources. The limited pipelines and dependencies pale in comparison to the sheer freedom from an open-source language like Python. This was one of the main factors that pushed Charly into the Python community.
What you will Learn
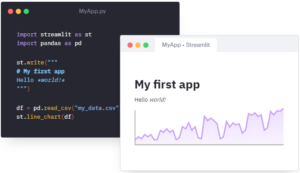
In this Ranksense Webinar, you will learn how to build a Simple HTTP Code Checker in Python using the Streamlit library. Streamlit is a user interface that turns data scripts into shareable web apps in minutes. You will use Streamlit and make an app that can take up to 20 URLs and check their status codes and redirect statuses. Additionally, this app is modular. As a result, you can extend the functionality of this app by adding more widgets. That is what Streamlit excels in doing: making self-contained widgets independent from the framework.
Why use Streamlit?
As Charly explains how Streamlit can help make apps, he outlines the four basic principles that it works on:
Embracing Python Scripting: This principle is what really drove Charly into learning Streamlit and deploying apps through it. As more and more digital marketers and SEO influencers are embracing Python, one can hardly deny the popularity of Python. A great thing about Streamlit, that Charly points out, is that it only requires Python. You don’t have to learn HTML or CSS to implement Streamlit. This is critical as many marketers have an initial fear of programming, which leads to automating tasks seeming a daunting process. Streamlit helps streamline that. This means that it is used to make an application that is running in another instance being hosted on a server. This is one example of how easy it is to use Streamlit with Python:
Weave in interaction: In Python, declaring variables is one of the most fundamental and easy-to-learn ideas. With Streamlit, Charly emphasizes the possibility of having a seamless interaction by treating the widgets for the apps as variables. ThisThis has a number of benefits. The biggest one being you don’t have to write backend code. Backend is the code that makes the visually appealing things run. If you see a fancy database library with cool animations and features, there’s usually a lot of code that goes into making it. That part of it, which actually runs the widget, is called backend. There’s also no need to define routes and handle HTTP requests to run the app. Since everything is integrated, it’s very seamless, such that everything is a drag and drop with some basic coding.

Integrates with ML: Streamlit integrates well with machine learning frameworks like Keras, PyTorch or TensorFlow. This is great because if you want to deploy an app that benefits from Machine Learning, Streamlit can make that easy and customizable for you.
Components: Streamlit has a plethora of components, designed by people to tap into component systems of JS, React, Vue, and other frameworks. There are components to make custom widgets, to plot graphs, to visualize 3-D models, etc. Here are two example components out of the otherwise vast majority of components:

Alternatives to Streamlit?
Frameworks : There are a number of web frameworks that can be used instead of Streamlit. These include Flask, Django, Bottle, Pyramid, etc. These are great alternatives to Streamlit, as they are as versatile and a little more tweakable. These web frameworks often require HTML, CSS and JS. For someone trying to learn about web frameworks, and does not want to use Streamlit, these are great alternatives.
Dashboarding solutions: A tool like Panel could be used in more advanced situations, for example, in a notebook, django, or a voila server. However, Panel(add link) can be moderately difficult to learn with its extensive rules and complex interface. There is also Dash and Voila (links) that can replace Streamlit.
What you need
Compulsory
- Python 3.6 or above
- A command prompt
- A Github account to deploy the app
- An invitation to Streamlit Sharing
Optional
- A Virtual Environment to isolate dependencies (e.g. virtualenv)
- An IDE to edit the code – Charly uses VSCode but any would work (e.g. PyCharm, Spyder, etc)
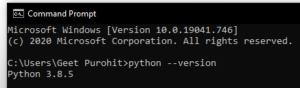
The very first step is to make sure you have Python 3.6 or above on your computer. If you are ever unsure, you can always open the Command Prompt and type python --version. Here is an instance of me doing it:
For macOS users, you can follow the same step, but there is one less hyphen in the command. That is, python -version. You also need a Github account to deploy the app. If you are using an IDE, such as VSCode, Eclipse, Vim, Emacs, PyCharm etc, then it’s good to isolate dependencies for the virtual environment. Charly uses VSCode but any IDE is fine.
Now we go ahead and download the files and create a folder on the local machine (you can name it anything). If you choose to access Charly’s Github and pull the files from the Github repository, you can go to this link and download the files. Another good idea is to install the Python libraries in a virtual environment. This helps with all the functions that Charly will define later on.
The next step is to activate the Virtual Environment and one can do this by simply calling some commands. To set up and activate your virtual environment, follow these simple steps:
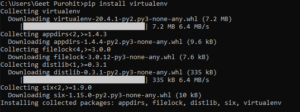
First we run the pip install virtualenv to install the library on our local machine. This allows us to call virtualenv on any IDE since the Python that we are using (on our local computer) now has the virtualenv library with it. If you do not wish to use command prompt to install virtualenv, you can also type from pip._internal.utils import virtualenv in an IDE and it would achieve the same result.
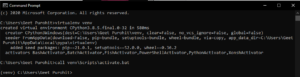
Once you successfully run the commands, you should see the virtualenv compiled. This basically means that you have a virtual environment in which you are running the commands from hereon. You should see a (venv) before any indication of the terminal, which means you have successfully activated the virtual environment. Once you are done with your tasks, you can type deactivate to quit.


Note – you can see the difference between passing a command in a virtual environment versus passing it in a non-virtual environment. The latter throws an error since the terminal is not aware of such a command.
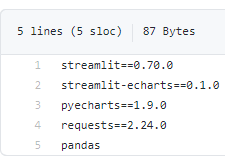
Just like we installed virtualenv, now we install Streamlit, requests, and pyecharts and streamlit-echarts all together. While running the streamlit run app.py and command in your terminal, it is possible that you will run into an error due to missing “build dependencies.” If you run into that error it is highly likely that you don’t have dependencies for Microsoft Visual Studio Build Tools. You can get them here. If that still does not work, you can try installing streamlit in a virtual environment like venv. If both the solutions do not work, it is highly likely that you do NOT have Python 3.6 or above. Check your version using the command we talked about before and make sure you have the latest version. You can go here to check for the latest version.
After installing the libraries, you can run the app by typing streamlit run app.py and you should be able to successfully run the command. Since the app is a HTTP code checker, it will check HTTP codes for you. Charly has a demo on the Github website. If you go to that website and click the link that says Open in Streamlit, then you can see a live instance of the app:
Clicking that link will bring you to this page:
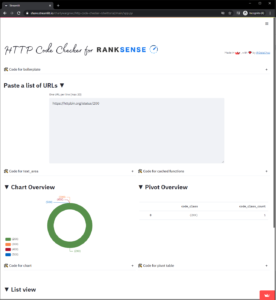
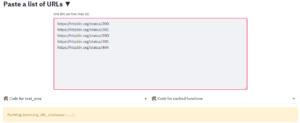
Here you can run HTTP code requests to see if they are working or not. For example, I could run a batch of URLS and it will check the status of each one. The interesting thing, however, is what it does with the data. Since this app was made with Streamlit, Charly utilized some of the fancy libraries and components to display a Char Overview and Pivot Overview.

There is also a Code for Chart drop down option for those who are interested in the code for it. The same applies to Pivot Overview:
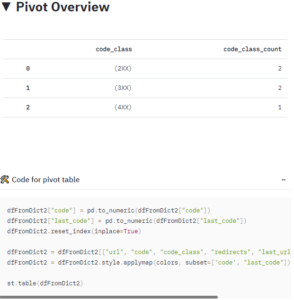
From this information, you can extract multiple data points such as the URL, Code, Code Class and the amount of redirects. This data can be presented in a List View that displays the data frame.
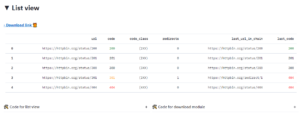
All these widgets are really useful for presenting the data, since all of this is customizable and formattable. The download link exports the data in a .csv file that can be used by Excel.
Deploying the App
To deploy the app, you need to head to streamlit.io/sharing and you can put your name in the Google Sheet that they provide. Once you do that, you will receive an invite. Once you have your app ready to deploy, you can go to share.streamlit.io/deploy and that link will have all the features you need to deploy an app.
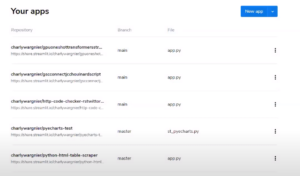
After you have an invite and an account, your dashboard would look like this. This is Charly’s dashboard. To deploy the app, click on the New app button. You can go to the aforementioned URL as well (as long as you are logged in).
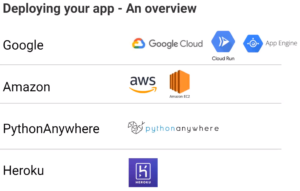
Streamlit sharing makes it easy to deploy your app since it supports a lot of hosting platforms such as Google Cloud, Amazon AWS, PythonAnywhere, Heroku, etc. With Streamlit sharing, all you need to do is make a Github repository with your files.
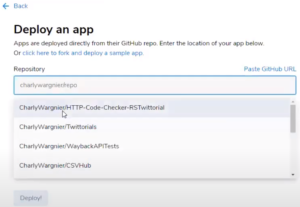
Streamlit sharing makes it easy to deploy your app since it supports a lot of hosting platforms such as Google Cloud, Amazon AWS, PythonAnywhere, Heroku, etc. With Streamlit sharing, all you need to do is make a Github repository with your files. When you are ready to deploy an app, the link will ask your repository link. It can detect different branches as well. Once you replace the main file path with the name of your app, you can go ahead and hit Deploy. The only thing that is left is to add all your libraries to requirements.txt file in your Github (since you downloaded Charly’s files and uploaded them to your own Github, you would most likely find it there).
Once you deploy the app, you are good to go and you’ll be able to see the launch result on the left and the console on the right:
Walking through the script
The Python script for running the application is about 600 lines and very in-depth. Thus, this blog will not cover it, except some important functions that are critical in running the application and those that pertain to the SEO element of the app. Feel free to check it out here.
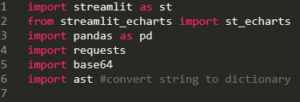
Charly starts by importing the streamlit, echarts, pandas, requests, base64, and ast libraries to help with the script. Another important part of the app is the cache functionality. Cache data is data that is stored on your device after any app launches for the first time. The reason for storing such data is so that it opens faster next time. Charly goes over his caching functions that envelope his fetching and extracting functions:
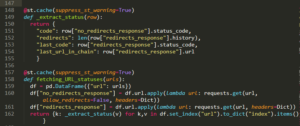
In the extract function, the focus is to declare variables that reflect different data points in a website and append them to a data frame. In the fetching function, Charly takes the URL that you enter as a parameter and makes a data frame out of that. After that, he iterates over the data frame continuously to extract data from it. The cache decorators that go before a function help remember calls so that the entire sequence is smooth and quick.
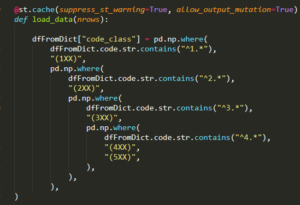
Another function that Charly emphasizes is the data loading function. This function here helps to categorize the possible inputs from the users, making it so that the user can input any HTTP code suich as the 200 family, 300 family, etc. Again, it is preceded by a cache decorator.
Closing Remarks
Once again, we would like to thank Charly Wargnier for the informative presentation for the app and the Streamlit library. If you would like to contact him, you can do so on Twitter. Charly’s script and subsequent hosting instructions are on GitHub for anyone to leave questions or suggestions. Be sure to visit @RankSense on Twitter for new updates on upcoming events.